
Disclosure: WebFin is reader-supported. If you buy hosting through links on this page, we may earn a commission at no extra cost to you. Commissions vary between providers and our ratings do not — here’s our full disclosure.
To point a domain to a new host, you change where its DNS sends visitors: either the nameservers, which hand every record to the new host, or the individual records, which keep control where it is. You do not need to transfer the domain, and you should not try to on the same day. Pointing takes minutes to make and a few hours to settle. The part that goes wrong is email, because the records that deliver it live in the same place and are easy to overwrite.
How to Point a Domain to a New Host: The Short Answer
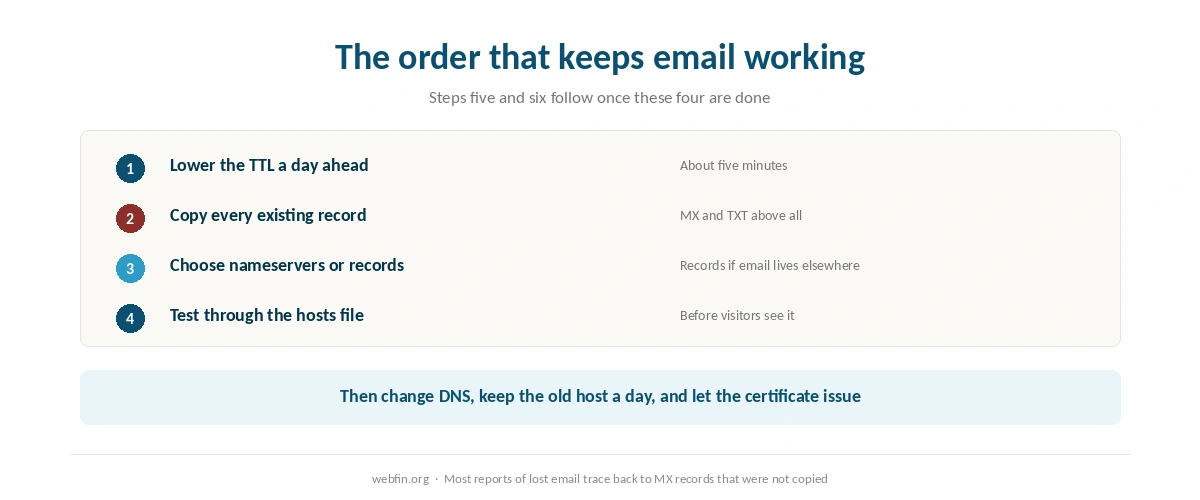
A day ahead, lower the TTL on your records. Copy every existing record, especially MX and TXT. Then either switch the nameservers to the new host or change the A record to its IP address. Keep the old hosting running until traffic has moved, and let the new host issue its certificate.
Pointing Is Not Transferring
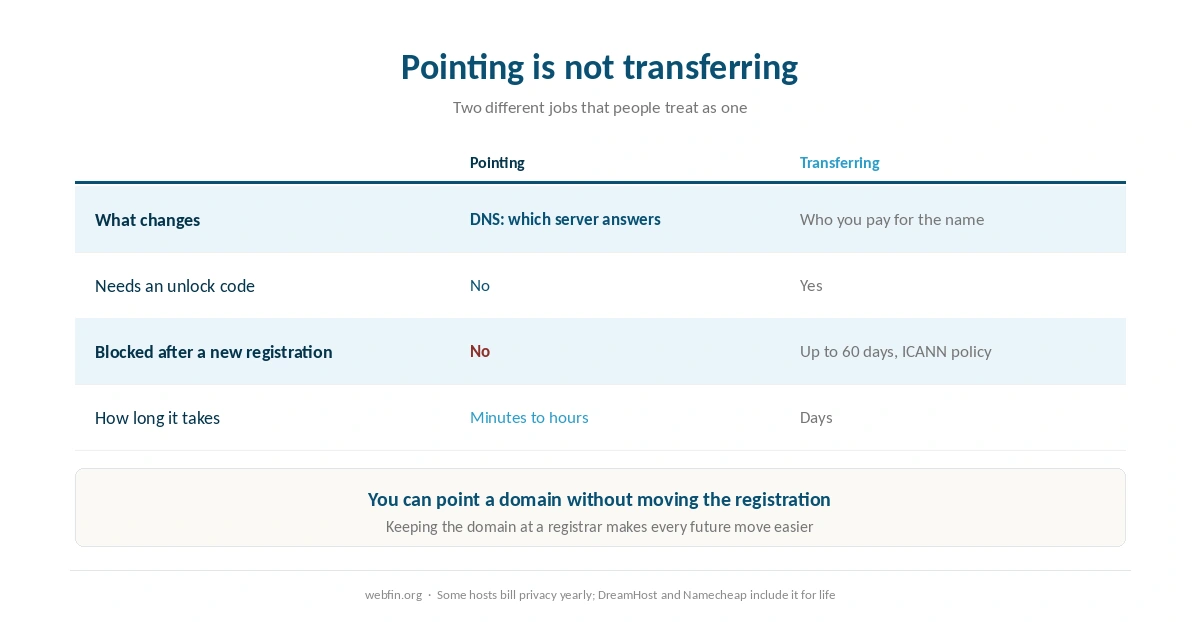
These are two different jobs that people treat as one. Pointing changes DNS, which decides which server answers for the domain. Transferring moves the registration from one registrar to another, which decides who you pay each year for the name itself. Our page on choosing a domain registrar covers why domains sit outside every hosting table we keep.
Pointing needs no unlock, no authorization code and no waiting period. A transfer is different. Registrars can refuse one for a period after a domain is registered or moved: 60 days under the long-standing ICANN policy, and 30 days under the revised policy that registrars are rolling out during 2026. So if the new host offers to move the domain as part of signup, you can decline and point it instead. Our guide to migrating web hosting covers the full move, and this page covers the DNS part in detail. When you do want to move the registration, see how to transfer a domain.
⚠️ Where the domain is registered matters for the long run. A domain held by the host makes leaving one step harder. Some hosts also bill privacy separately: Bluehost, a Newfold Digital brand, charges $15.00 a year for it. DreamHost and Namecheap include it for the life of the domain. Bluehost also keeps $15.99 of a refund for a free domain, as our comparison of Bluehost against DreamHost notes. The table below lists these charges.
| Host | Charge | Cost per year |
|---|---|---|
| Bluehost | Premium SSL, single domain | $89.88 (optional; Let's Encrypt is free) |
| Bluehost | Domain privacy | $15.00 (free year one on Business and up) |
| Bluehost | SiteLock Essentials | $95.88 |
| Bluehost | SiteLock Prevent | $239.88 |
| Bluehost | Yoast SEO Premium | $99.99 |
| Bluehost | Early cancellation, free domain | $15.99 one-off, deducted from refund |
| GoDaddy | SSL on Economy after year one | $119.99; other tiers include it for the plan's life |
| GoDaddy | Pre-checked extras at checkout | $345.39 counted by one review, unverified |
| HostGator | CodeGuard daily backups | $35.88 (weekly copies are a courtesy, not guaranteed) |
| HostGator | SiteLock, pre-selected at checkout | $23.88 |
| HostGator | Dedicated IP | $59.40 |
| HostGator | Professional migration | $149.99 one-off |
| Hostwinds | Standard SSL | $75.00 (free AutoSSL on shared via cPanel) |
| Hostwinds | Wildcard SSL | $150.00 |
| Scala Hosting | Processor core, added or removed anytime | $36.00 per core |
| Scala Hosting | Memory, added or removed anytime | $12.00 per gigabyte |
| Hostinger | WHOIS privacy | Included |
| Hostinger | Domain renewal, .com | $15–$20, no first-party figure published |
| DreamHost | WHOIS privacy | Included for the life of the domain |
| Namecheap | Domain privacy | Included for the life of the domain |
| InterServer | Everything on the one plan | Included; no tiers to upgrade to |
Step 1: Lower the TTL a Day Ahead
Every DNS record carries a time to live, which tells resolvers how long to cache it. Many registrars default to an hour or more. If you change a record while that value is high, some visitors keep reaching the old host until their cached copy expires.
So the day before the move, drop the TTL on the records you will change to about five minutes. Wait for the old value to run out once. When you then make the real change, caches refresh quickly and most visitors switch within minutes rather than hours.
Step 2: Copy Every Existing Record
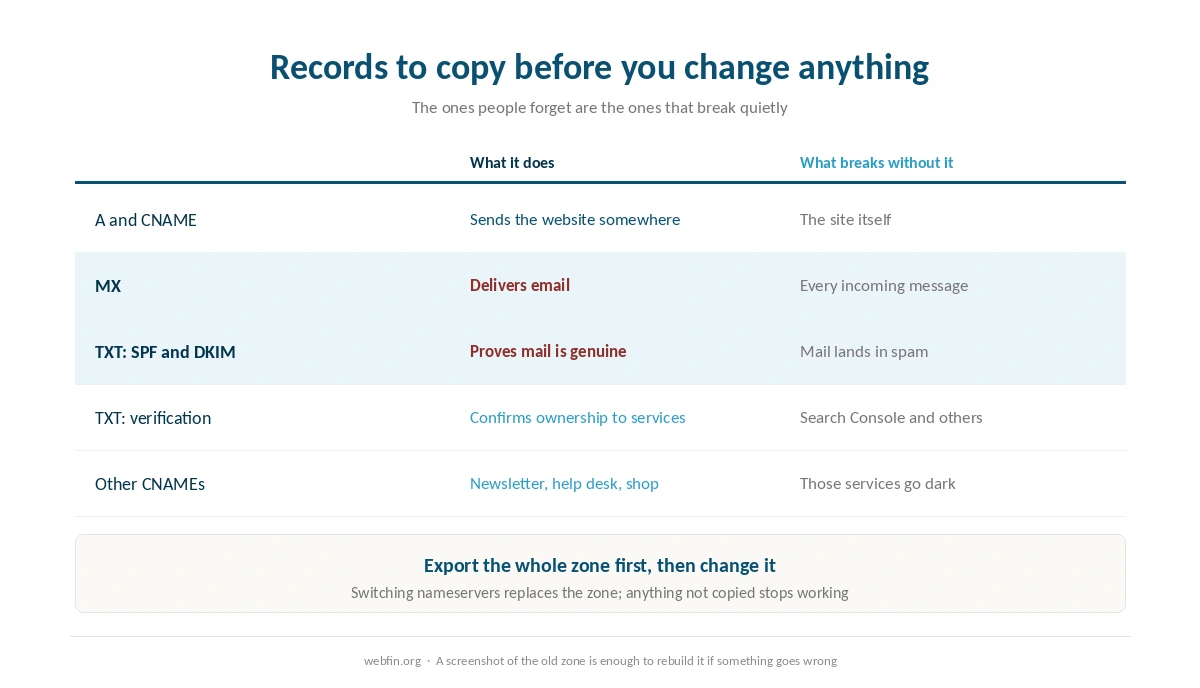
Before touching anything, export or screenshot the full zone at the current DNS provider. The records that matter most are rarely the ones people think about: MX for email, TXT for SPF, DKIM and domain verification, and CNAMEs for services such as a newsletter or a help desk.
This step decides whether email survives. Switching nameservers hands the whole zone to the new host, and if its default zone lacks your MX records, mail stops arriving. Copy them across first, then switch. Before any of this, take a full backup, as our guide to backing up a WordPress site explains, so a mistake in DNS never becomes a mistake in data.
Step 3: Choose Nameservers or Records
Change the nameservers if you want the new host to manage everything. It is the simplest route, and the host’s dashboard then controls DNS, including email records and certificates. The cost is that DNS moves with the host, so leaving later means doing this again.
Change the A record, and a CNAME for www, if you want DNS to stay where it is. The registrar or a separate DNS provider keeps control, and only the web traffic moves. This is the better route when email or other services sit elsewhere, because nothing else changes. Hosts that register domains themselves make the first route the default, and our DreamHost review covers one that keeps privacy free either way.
Step 4: Test Before the Switch
You can see the site on the new host before DNS changes by editing the hosts file on your own computer to map the domain to the new IP address. Browse the site, log in, submit a form. Then remove the line again, so your computer follows real DNS.
Many hosts also give a temporary address for the same purpose. Either way, the point is to find a broken plugin or a missing file while the old site is still serving visitors. Our guide to setting up a staging site covers a longer version of the same idea.
Step 5: Make the Change and Watch It Settle
Update the nameservers at the registrar, or the A record at the DNS provider. Then check from outside your own network, with an online DNS lookup or the dig command, until the new values appear. With a lowered TTL this usually happens within minutes, although some resolvers hold records longer than they should.
Keep the old hosting running through this period. Visitors on a slow resolver still reach it, and anything they submit there should not be lost. When traffic has moved and a day has passed, our guide to canceling hosting and getting a refund sets out the safe order for closing the old account.
Step 6: Let the New Host Issue Its Certificate
Most hosts issue a free certificate automatically once DNS points at them, because the issuing authority checks that the domain resolves to the server requesting it. Until then, visitors on the new host may see a certificate warning.
If the warning persists after DNS has settled, trigger the certificate manually in the dashboard. Our guide to installing an SSL certificate covers that, and paid certificates are rarely needed for an ordinary site.
What to Do If It Does Not Work
The old site still appears. Your computer or network is caching the old record. Check from another network, flush the local DNS cache, and wait out the old TTL.
Email stopped arriving. The MX records did not move with the nameservers. Add them at the new DNS provider exactly as they were, and mail resumes as caches refresh.
A certificate warning appears. The new host has not issued one yet. Wait for DNS to settle, then request it again from the dashboard.
The registrar says the domain is locked. That lock affects transfers, not DNS. Pointing still works, and you can transfer later if you want to. If the site is fully down instead, our guide to fixing a website that is down starts with the DNS check.
How We Research
This guide describes procedures rather than measurements, and it runs no tests. The transfer rule comes from ICANN’s transfer policy. Privacy and domain charges come from the providers’ own pages, read on 20 September 2026, and sit in the table above.
Registrar dashboards differ, so the menu names here are general rather than tied to one company. The criteria behind our scores are on our about page, and the domain terms for one registrar that also hosts are in our Namecheap review.
Domain Pointing FAQ
No. Pointing changes DNS, which decides which server answers for the domain. Transferring moves the registration to another registrar. You can point a domain at any host while leaving the registration exactly where it is.
Usually minutes if you lowered the TTL a day ahead, and a few hours if you did not. Old records expire from caches according to their TTL, and some resolvers hold them longer, so keep the old hosting running for a day.
Nameservers if you want the new host to manage all DNS, including email. The A record if DNS should stay with your registrar or a separate provider, which is the safer route when email or other services live elsewhere.
Because the MX records did not move with the nameservers. The new host’s default zone often lacks them. Copy them across exactly as they were, and mail resumes as the old records expire from caches.
Registrars can refuse a transfer for a period after a domain is registered or moved: 60 days under the long-standing ICANN policy, and 30 days under the revised policy rolling out during 2026. That lock does not affect DNS, so you can point the domain at the new host immediately and transfer it later.
The Verdict
Pointing a domain is a small job that fails in predictable ways. Lower the TTL a day ahead, copy every record before changing any, keep the old hosting running while caches refresh, and let the new host issue its certificate. Almost every problem people report comes from skipping one of those four.
Treat the registration as a separate decision. Keeping the domain at a registrar rather than the host makes every future move easier, and choosing one that includes privacy removes a yearly charge. Our page on hidden hosting fees lists the charges that follow a domain around.