
Disclosure: WebFin is reader-supported. If you buy hosting through links on this page, we may earn a commission at no extra cost to you. Commissions vary between providers and our ratings do not — here’s our full disclosure.
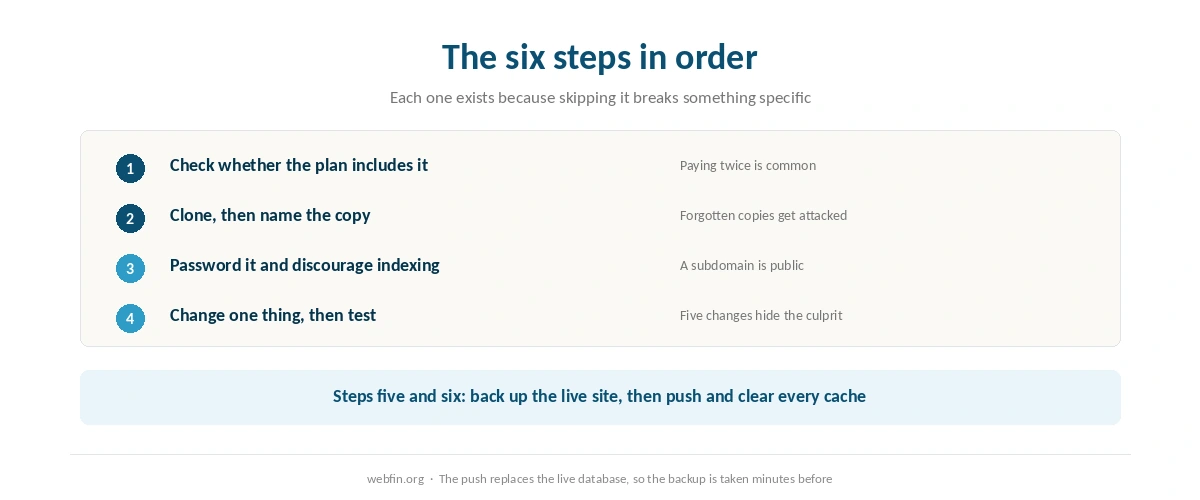
To set up a staging site you clone the live site into a private copy, change the copy, and push the result back. Most hosts now do the cloning with one button. The part that goes wrong is the push, because a staging copy carries its own database, and sending it to production can overwrite everything the live site collected while you worked. That risk shapes the whole procedure below, and it is why the last step is a backup rather than a celebration. Hosts that build staging into the workflow are compared in the best hosting for developers.
How to Set Up a Staging Site: The Short Answer
Open your host’s WordPress tools and look for Staging. Create the copy, note the temporary address, and block it from search engines. Make changes there, then push back with a fresh backup in hand. If your plan has no staging tool, the WP Staging plugin does the same job for free. Membership releases are the riskiest kind, as hosting for membership sites explains.
Step 1: Check Whether You Are Already Paying for Staging
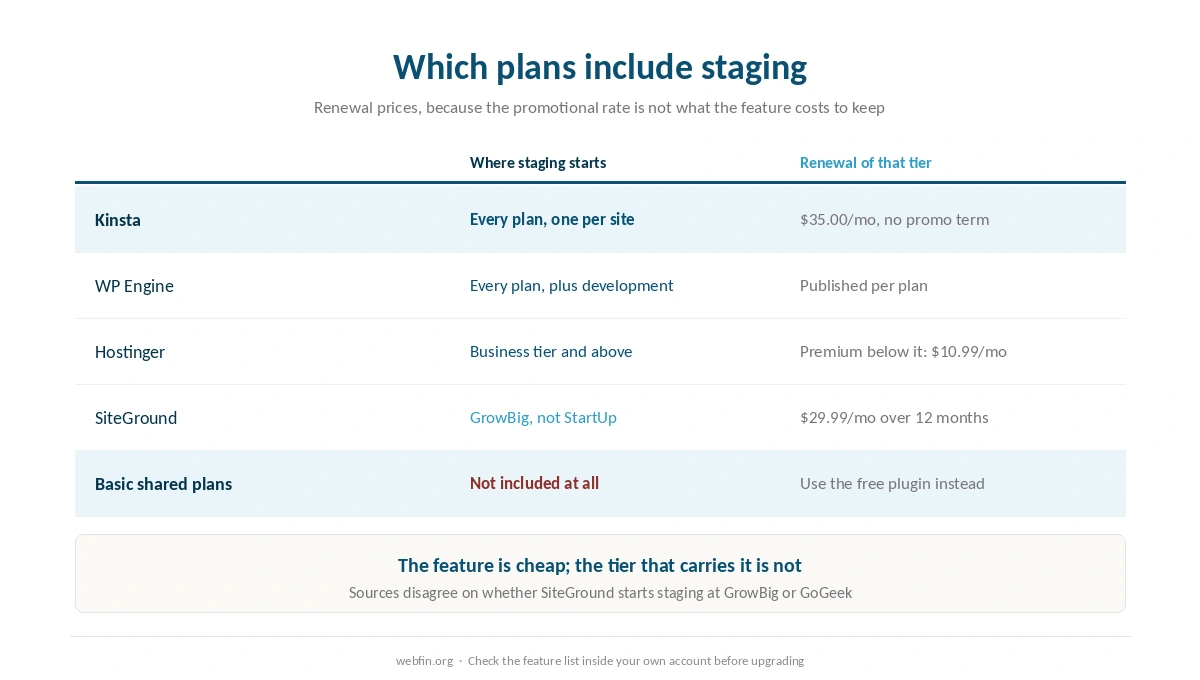
Staging is a tier feature, and plenty of people buy it twice by accident. Kinsta and WP Engine include an environment on every plan. Hostinger includes one from the Business tier upward, and our Hostinger review prices that step. SiteGround starts staging on GrowBig rather than StartUp. That is the detail most roundups get wrong in one direction or the other.
⚠️ Sources disagree on that last one. Several guides published this year put staging on GrowBig, and at least one puts it on GoGeek. Check the feature list inside your own account before assuming either, because the difference between those tiers at renewal is $29.99 against $44.99 a month over 12 months. Our SiteGround review prices every tier in full.
Basic shared plans usually have nothing. Namecheap Stellar does not offer staging, and neither do the cheapest tiers at most budget hosts, which sends you to the plugin route in step 6. Our roundup of the best WordPress hosting marks which plans include it.
Step 2: Create the Copy
In SiteGround the path is WordPress, then Staging. In Kinsta and WP Engine it sits under the site itself. Hostinger keeps it in hPanel beside the WordPress tools. Whatever the host, the button clones files and database together and hands back an address on a subdomain.
Give the clone a name you will recognize in a month. A staging copy left behind is the commonest way people end up running an old, unpatched WordPress install on their own domain, and attackers scan for exactly that.
Step 3: Hide It From Search Engines
A staging copy on a subdomain is a public website until you say otherwise. Google can index it, and then your unfinished pages compete with your real ones. Most staging tools set a password by default, and the WP Staging plugin does too, but checking takes ten seconds. Rehearsing a course launch is covered in hosting for online courses.
Belt and braces here is fine. Password-protect the subdomain, and leave the Discourage search engines box ticked in Settings, then Reading. Both together cost nothing and remove a problem that is tedious to clean up afterward.
Step 4: Make the Changes You Came For
Staging earns its keep on four jobs: major WordPress releases, plugin updates that touch checkout or forms, theme switches, and PHP version bumps. Do them one at a time and load the site between each, because a white screen after five changes tells you nothing about which one caused it.
Test the boring paths, not the pretty ones. Submit the contact form. Buy something with a test payment. Log in as a subscriber. A redesign that looks right and cannot take an order is the usual result of testing only the homepage.
Step 5: Push Back Carefully
This is the step that eats sites. The push copies the staging database over the live one. Anything the live site recorded while you worked can disappear: orders, comments, form entries, new users. Some hosts offer partial merges. Still, the default behavior on most one-click tools is a full replacement.
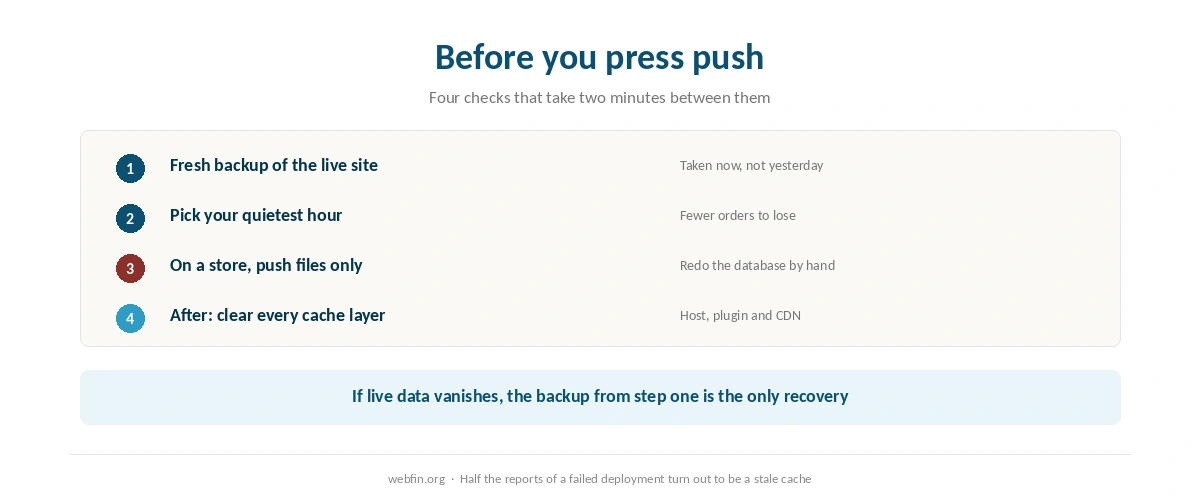
⚠️ Three rules make it safe. Take a fresh backup of the live site immediately before pushing, not yesterday. Push during your quietest hour. On a store or a membership site, push files only and reapply the database changes by hand. Our guide to backing up a WordPress site covers the first rule properly, and the stakes are highest on a store, which is why our WooCommerce hosting notes single out partial merges.
After the push, clear every cache you have. Host cache, plugin cache and content network cache all serve the old version happily, and half the panicked reports of a failed deployment are caches rather than failures. Our notes on speeding up a slow website explain which layers exist.
Step 6: If Your Plan Has No Staging Tool
Use the WP Staging plugin. It clones into a subdirectory of the same account, password protects the copy and runs on plans that include nothing. For a site of a few hundred megabytes it takes minutes, and the free version covers everything described above except pushing back automatically.
Two alternatives suit different people. A local copy with LocalWP keeps the work off the server entirely, which is the safest option and the least convenient. A manual clone into a subdomain teaches you what the tools do, and it means editing wp-config and running a search and replace on the site address. Neither is harder than a bad live edit.
What to Do If It Does Not Work
The staging site shows a white screen. Turn on WP_DEBUG in the copy, not on the live site, and read the error. It is nearly always a plugin that stores the domain in its own settings.
Images load on live and break on staging. The database still points at the old address. Run a search and replace for the site URL, or use the host tool that does it during the clone.
The push finished and the site looks unchanged. Clear caches first, then check in a private window. If it is still old, the push wrote to a different directory than the one your domain serves.
Live data vanished after the push. Restore the backup taken in step 5. This is why that step exists, and there is no other reliable recovery once the database has been replaced.
Staging Is Rarely Free, and the Price Is in the Tier
The feature itself is simple, so the money question is which plan carries it. At SiteGround the step from StartUp to GrowBig is $2.99 to $4.99 at the intro rate, which looks small, and $17.99 to $29.99 at renewal over 12 months, which does not. At Kinsta every plan includes one environment and the entry plan sits at $35.00 a month.
This is the pattern the site exists to point at: a feature advertised as included, priced into a tier, and quoted at the promotional rate rather than the renewal. Our page on hosting renewal prices lists what each plan costs in year two, and what web hosting costs runs the same figures out to three years.
How We Research
We run no speed or uptime tests, and this guide describes procedures rather than measurements. Plan availability comes from the hosts’ own feature lists and from comparisons published this year, read on 20 September 2026. Where those sources disagree, as they do on which SiteGround tier carries staging, we say so instead of picking the tidier answer. Our page on uptime monitoring covers why your own monitor beats any published percentage.
Prices are renewal prices unless labeled otherwise, because the promotional rate is not what the feature costs to keep. The criteria behind our scores are on our about page, and the plan-by-plan detail sits in our Kinsta review and the rest of the review section.
Staging Site FAQ
A private copy of your live site, files and database together, usually on a subdomain. You change the copy, check that nothing broke, then push the result back to production. The point is that mistakes happen somewhere nobody can see them.
It can. Most one-click tools replace the live database with the staging one, so anything recorded after you cloned can disappear. Take a backup of the live site immediately before pushing, and on a store push files only and redo database changes by hand.
Yes, unless you block it. Password-protect the subdomain and tick the Discourage search engines box under Settings, then Reading. Most host tools and the WP Staging plugin apply a password by default, though checking takes a few seconds and saves cleanup later.
Kinsta and WP Engine include an environment on every plan. Hostinger includes one from its Business tier. SiteGround starts it above the entry plan, and sources disagree on whether that means GrowBig or GoGeek. Basic shared plans usually include nothing.
For most sites, yes. WP Staging clones into a subdirectory, password protects the copy and runs on plans with no staging tool. The free version does everything except push changes back automatically, which many people prefer to do by hand anyway.
The Verdict
Staging is the cheapest insurance in WordPress, and on most plans you either already have it or can add it with a free plugin this afternoon. The tool is not the hard part. The discipline is: clone, block search engines, change one thing at a time, back up the live site, then push.
Skip any of that and the staging site becomes a second way to break production rather than a defense against it. If you are choosing a plan and staging matters, buy the tier that includes it rather than the one that advertises it, and read the renewal price first. Moving to a host that includes it is covered in our guide to migrating web hosting.